Wednesday, March 22, 2017

Lab 7: Save the Pixels

1. For one subject shoot at ISO 400, shoot three images:

A) Expose according to your camera meter


B) Add one stop of exposure (+1)


C) Reduce one stop of exposure (-1)


I think the best picture is the one with the one stop of exposure reduce. The picture looks less white than the well exposed (according to the camera meter) and the overexposed one. The use of a white foam core as background gives more reflection. By reducing the exposure, we reduced the reflection on the foam core.

2. For a second subject shoot at ISO 1600. Shoot two images.

A) At the right exposure (according to what you learned above)


B) One that is underexposed by one stop


In which image is the noise worse?
In the picture underexposed by one stop because we find the noise in the shadows

3. For a third subject. Shoot two images.

A) One in RAW


B) One in JPG


What is the difference between the JPG and the RAW image screen caps?
In the JPG image, there is less detail (less pixels) and the overall cast looks more greenish and I didn't change the white balance for the two images.

Wednesday, March 8, 2017

Lab 6: Histograms

Photograph a white object in three different scenes:

High-key scene


Low-key scene


A variety of tones scene


1a. According to the histogram, where do most of the pixels in your high-key image fall?
To the right of the histogram

1b. Are there any pixels in the in the high key image that would not print with detail?
The pixels that would be touching the right edge of the histogram (an overexposed picture will lose details).

1c. According to the histogram where do most of the pixels in you low-key image fall?
To the left of the histogram

1d. Are there any pixels in the low key image that would not print with detail?
The pixels that would be touching the left edge of the histogram (an underexposed picture will lose details).

1e. According to the histogram, where do most of the pixels in your varied tones image fall?
To the left of the histogram.

1f. Are there any pixels in the varied tones image that not print with detail?
I don't think there is any pixels that wouldn't be print with detail because there is no pixels touching the left or right edge of the histogram.

1g. Considering the information on the histogram, do you feel your camera is properly exposing the high-key and low-key scenes? Explain your answer.
I think my camera is properly exposing the high-key and low-key scene because we can see the major difference in the histograms. By being not to much underexposed, the tones in the histogram are more on the left edge and to the right edge for the overexposed picture. They aren't just in the middle of the histogram like the varied tone scene.

1h. Which histogram show the most dynamic range?
The varied tone scene histogram


Saturday, March 4, 2017

Lab 5: Noise Reduction

ISO 100 f11 1/15s

Low Noise Reduction


Standard Noise Reduction


High Noise Reduction


ISO 800 f11 1/125s

Low Noise Reduction


Standard Noise Reduction


High Noise Reduction


ISO 3200 f11 1/500s

Low Noise Reduction


Standard Noise Reduction


High Noise Reduction


Even if we took pictures at high ISO settings, the images will look sharp but it's by zooming in the pictures that we can see the difference. At ISO 100, there isn't a lot of noise and the Noise Reduction Setting don't really change the pictures. The more the ISO will be, the more noise will be visible. The more the Noise Reduction Setting is, softer the pictures will look.

I would use the Noise Reduction Setting in my camera but at Low and Standard to make sure not to lose to much details. The exception would be for sports photography in my case. Maybe it is going to make a big difference but I didn't try it yet.

Wednesday, February 15, 2017

Lab 4: Creative White Balance

1. In the library

AWB


Tungsten Light WB


Custom WB


In this case, the AWB gives a warmer colour cast (bit of orange), the Tungsten Light WB a little bit of blue in the picture and the Custom WB gives a cooler cast (greenish cast). Maybe it was the lighting of the library, but maybe how I took my picture of the white paper for the custom WB had affect the result.

2. Shoot in an area where there are two different colours of light

 In order, the first picture was taken with the AWB, the second with Shade WB and the third with White Fluorescent Light WB.

In the first picture, the AWB gives a grey hue. It was cloudy and snowy.

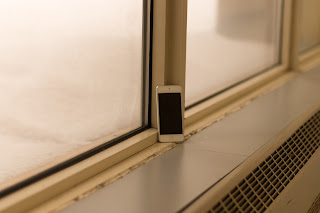
In the second picture, the Shade WB gives a warmer cast and in the last picture, due to the Florescent WB, there is a cooler cast (very blue cast). The blue cast is given by the Fluorescent preset that is normally use for indoor pictures (like in a room, hallway) but in that case it was near a window so there was shade light and fluorescent light.


3. Purposefully shoot with the wrong WB preset in order to introduce an overall colour cast to your image.

In order, AWB, Daylight, Shade, Cloudy, Tungsten Light, White Fluorescent Light presets.

For the outdoor presets (Daylight, Shade, Cloudy), the colour cast is warmer. For the indoor presets (Tungsten & Fluorescent), the colour cast is a lot cooler.

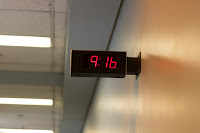
In that case, just like the pictures near a window, the clock is also near the window so we have shade light and fluorescent light. I think the AWB was the best for these pictures.


Tuesday, February 14, 2017

Assignment 1: Creative Use of Shutter & Aperture

1. Shoot a sport - Freeze the action

ISO 1000 f1.8 1/1250s
50mm

I really like to photograph sports (in this case: stunts) to freeze the action. The frozen action makes it possible to see something we can't see because of the speed of the movements executed. 


2. Pan a moving object

ISO 100 f16 1/40s
50mm

I think it is very interesting to have a sharp moving object with a blurry background. It gives an impression of movement in the photo. But instead of taking the picture with a high shutter speed, we took it at a slow shutter speed.


3. Shoot a night scene

ISO 100 f5.6 5.0s
50mm

In this picture, the speed isn't there. On the contrary, the shutter speed is at a long exposure. This long exposure allows us to capture those trailing lights of a car passing by the camera. The results of this kind of photo depends of the exposure we give.


4. Shoot a portrait with a shallow DOF

ISO 100 f1.8 1/2000s
50mm

The shallow DOF gives a blurry background in the picture. That allows us to focus more on the subject (in this case, the person). I tried to take the picture during the night, but the results weren't successful because the tripod I have is not that good. Because it is very light, when I release the shutter, that gives a little shake that makes the tripod move. With this picture, I was a fast shutter speed. That makes the picture sharper in that case.


5. Shoot a landscape/cityscape with a deep DOF

ISO 100 f22 0.5s
50mm

I took many shots of landscape and cityscape during the last week. I wasn't very happy with the result because I'm not happy with the tripod I have now. Just now, this was my best landscape but it is still a little bit blurry. Maybe if I had increase the ISO, I could have use a faster shutter speed.


I prefer to take picture with a fast shutter speed and a shallow DOF instead of a slow shutter speed and a deep DOF. Of course, it doesn't mean I won't take pictures with these criteria because all those types of pictures (fast vs slow shutter speed, shallow vs deep DOF, panning vs freeze the action) gives something special to the photos depending of the situation.


Wednesday, February 8, 2017

Lab 3: Lenses


Part 1: Lens Focal Length

1. Still Life

I used my 18-135mm Lens to this part. I played with the 18-55-135mm focal length. 


ISO 800 F5.6 1/25s
18-135mm (18mm)


ISO 800 F5.6 1/25s
18-135mm (59mm)


ISO 800 F5.6 1/15s
18-135mm (135mm)


My aperture for this project was at F8 and I can remark that the background become more blurry the more the focal length increases. I think there is more distortion in the first picture than the last one. The lens is the last picture seems to be the sharpest.

2. People

ISO 400 F8.0 1/8s
18-135mm (18mm)
ISO 400 F8.0 1/8s
18-135mm (69mm)


ISO 400 F8.0 1/5s
18-135mm (135mm)


The first picture isn't very sharp compared to the last two. Maxime seems kind of blurry in the second picture compared to Andriana who's very sharp. In the last picture, Andriana in the foreground is sharp and Maxime in the middle ground seems more sharper than in the 2nd picture.

Part 2: Focal Length and Depth of Field

ISO 400 F8.0 0.4s
18-135mm (18mm)
ISO 400 F8.0 0.4s
18-135mm (56mm)


ISO 400 F8.0 0.4s
18-135mm (135mm)


The sharpest picture is the last one because we really can see the background but the foreground is a little bit blurry. The first picture is more of a global shot so the foreground (column) and the middle ground are seems sharp but we can't really see details in the background. In the second picture, the column is what I think is the more in focus and the background is still very blurry because the end of the hallway is far away.

Part 3: Test your Lens

ISO 100 F2.0 1/2000s
50mm


ISO 100 F4.0 1/500s
18-135mm (18mm)


ISO 100 F5.6 1/200s
18-135mm (135mm)


ISO 100 F8.0 1/125s
50mm


ISO 100 F11 1/60s
18-135mm (18mm)


ISO 100 F16 1/25s
18-135mm (135mm)


ISO 100 F22 1/15s
50mm


ISO 100 F32 1/6s
18-135mm (135mm)


I remark that the Focal Length of 18mm at wide aperture has a lot of distortion compared to the 50mm and 135mm with the same Aperture. The more the aperture became small, the less distortion is the picture we see. I think the distortion depends of the aperture and the focal length of the lens used. We can see in some pictures that the edges are softer than in other pictures.